Showing posts with label DIY. Show all posts

Sunday, March 22, 2020

Helmar Accepted ME!


I am thrilled to tell you that I am on the Helmar Design Team as of April 2020.

I have long been an admirer of their products and creative applications.  


The product range is so great, silicones, glues, lubricants, jewelry glues, paper glues and more.

Look for projects to come using the fine Helmar line.

Sunday, March 17, 2019

I made this for a friend

I had one in my house for St Pat's day and she admired it. So I made it for her.


I added a twist on hers, it's two-sided so she can leave it up for Spring and Easter if she wants to.


I started with a dollar store plaque with a wire hanger.  I applied a base paper and an image with a solid mat.  I inked some of the edges for definition.  I graced it with fun embellishments.


Decor can be affordable and creative with our Digital images and embellishments: flowers, ribbons, trims, and fibers.  I will make more of these for friends and other holidays.  

Digital Art
Embellishments
INKS

Happy St Pat's Day to YOU.


Friday, February 8, 2019

FREEBIES for VALENTINES

GRAB THESE FUN PRINTABLES FOR YOUR VALENTINES!

CUT THEM OUT, PUNCH A HOLE, ADD SOME RIBBON OR TWINE AND GIVE WITH CARDS, PIECES OF CANDY OR HANG AROUND THE HOUSE OR OFFICE


Simply right click with your mouse and then "save to" your desktop.


Thursday, January 10, 2019

Out with the Old and In with the New - Take 2

I'm still working on the concept of out with the old and in with the new here at present but rather than throw out the old, it's in my heart to be repurposing as much as I can. 

I have been painting over old paintings and my journal to kick start this year was made from a piece of cardboard that came perfect in size and already scored to have a spine, and big enough to fit Signatures of A3 Size Sheets of Water Color Paper.


To cover the outside of my journal I used the fabric of an old shirt and the inside was lined with some papers I handmade in 2017.  
My internal spine was cut from another piece of sturdy cardboard and I simply lined up and punched three holes at the top and bottom on this piece.  I then took a piece of red elasticized thread and weaved this through the holes to create four page holders in my journal.  By pulling this thread tightly they hold the pages in firmly but allow me to remove each piece to work on them separately meaning I don't get lots of fun creative inky mess on my journal and its covers.


You can see in the photos it holds the page I shared with you from my last post beautifully and because our post today is all about the heart I am doing a bit of a Throwback Thursday also showing you a Gel print I did some time ago where I used punched out heart shapes as a mask.  The other page was done taking inspiration from my frangipanis in flower.  I used my watercolor pencils (see the special offer and get a FREE watercolor tube Brush) and gelatos to do this.


I am loving that I am in my creative flow at present, I've been journaling and painting and even writing some haiku poetry of late also.  If you are looking for lots of product inspiration to get creative in 2019 then be sure to check out all the wonderful supplies here on the website.

Have you already found this New Year has you all inspired and ready to create?  I'd love to know.

Danie xx


Saturday, December 29, 2018

REINVENTION

2019 will be a year for reinventing.
That includes my self, my art, my business and even new relationships.


Stale is a word I dislike and I feel stale.  2018 has been a challenging year for so many people and we all can use a fresh start, a positive attitude, and a creative sparkThat spark can be your cooking, your home, your art, YOUR relationships.

I found some unusual (to me) ways of celebrating the new year...

In Denmark, they save all of their unused dishes and plates until the 31st of December when they affectionately shatter them against the doors of all their friends and family.  (careful!!)

In Spain, the New Year’s tradition for good luck revolves around grapes. If you can manage to stuff 12 grapes in your mouth at midnight you’ve achieved good luck for the next year.  (not all at once I hope!) 

In some South American countries wearing colored underwear will determine your fate for the new year. Red underwear means you’ll find love. Gold means wealth, and white signifies peace.  (How about Hello Kitty?)

In the USA often involves Black Eyed Peas, meant to represent coins or wealth.  (My mother-in-law always opened a can and took one spoonful)


In Scotland, the first person to cross the threshold of a home in the new year should carry a gift for good luck. (I would like a new Kitchen Aide Mixer please)


This one is from a 'Pittsburgher' (my hometown).
How many people still put silver change (nickels, dimes, quarters) outside on their windowsills for New Year's Eve?  I was taught that it is a tradition to bring money into the house for the New Year..!!  AND Remember no chicken today or you’ll be scratching for money the rest of the year

See our group of New Years Collages to make gift tags and placeholders!

ENJOY YOUR 2019, WITH OR WITHOUT CHANGES.  MAKE IT WHAT YOU WANT.

Monday, October 1, 2018

DIY Tricks and TIPS for all over the house

We all like to be savvy and efficient and make tasks easy, right?

Let us help you to make it easy!


The Winter holidays bring out our fancy dishes and glassware, store them with coffee filters and avoid scratches or breakage.


Easy De-icer.Fill a clean spray bottle with 1 part water and 2 parts rubbing alcohol and store it in your car during winter months.  It won't freeze! Spray it on your windshield and windows on those chilly mornings to make scraping easier.  Did you know that hand sanitizer is usually alcohol based?  Squirt it on frozen locks to allow your keys to work.


SOCKS are for more than FEET!

Place them snugly on windshield wipers with a rubber band in a pinch.  They also keep the wipers from freezing to the window at night.

Keep socks in your glove box to use as gloves in a pinch.  You can use them on your hands to wipe away foggy windows and mirrors too.

Reuse plastic grocery bags to fill pillow forms, especially for outdoors.  Pack it full, zip it shut and VOILA.  You can remove them if they get wet or simply need to be freshened.   

This works great for dog beds too!  

Use two rag rugs stitched together and fill tightly with recycled plastic bags.  You can throw this in the washer too!  HANG TO DRY.

Hope these are fun ideas to get your thoughts going for even more uses of regular old items becoming new ways to use them around the house.


Thanks for dropping by and sharing us. 


Wednesday, September 19, 2018

Sweet gifts for Friends.

Do you agree that Homemade is the BEST?
We think so.


As you know, we carry mason jar lids and metal rings, this project uses both.   Plus our wonderful collage sheets.  You can order a full kit or purchase the individual items. 
Our collage sheets allow you to make any jar theme you want; kids, women, men, floral, holidays.  

Read to the end for a wonderful "recipe".

These precious lids become ornaments 
or simply jar lids!  
Add lace to finish it off.  


Think out of the box.  Jars hold so much more than foods, it can be luxurious body care items, or a fun and wacky birthday gift.


Homemade Luxurious Moisturizing Lotion:

16 ounces baby lotion
8 ounces coconut oil (solid form, not melted)
8 ounces vitamin E cream

Mix together with a handheld mixer until it resembles icing.
Store in airtight containerskeep it for your own supplyor create a label or lid insert for gift-giving!   Collages are available to create lid inserts.
My friends loved it! 

Cost breakdown:
Extra Virgin Coconut Oil $7.00
Dollar Store Baby Lotion $1.00
Dollar Store Vitamin E Cream $1.00
Use half the jar of coconut oil, the whole bottle of baby lotion & 1/2 the jar of vitamin E Cream.

Thursday, May 18, 2017

Refab-ulous Table

Let's take a table with some miles on it and make it look this fabulous.
Dixie Belle Paints rescued this well-loved wooden table.
Love the lines.
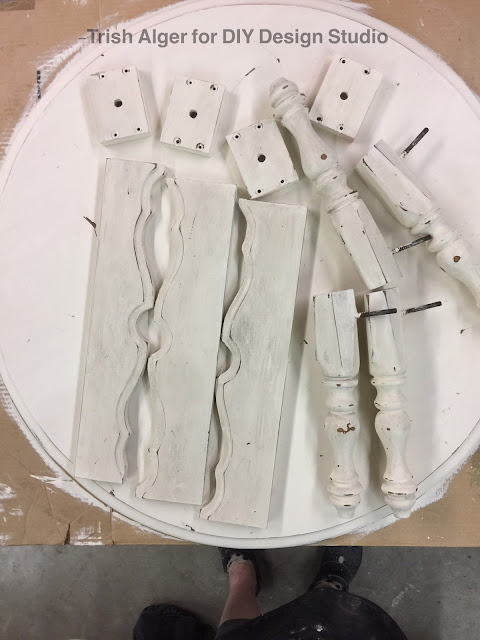
Here is the underside, after removing all of the parts:
Yep, the top of the table had a long crack in it.
Wood glue to the rescue.
Love the softness of the Buttercream.
Looking good.
A close up:
Realized there was an uneven place after gluing, so I added some Dixie Belle Swamp Mud to fill in the gaps. Sanded it down and painted a thin layer of paint over it. 
(YES, I placed the Swamp Mud over paint. These products are amazing!)
While the table top rested I did some rust cleanup. The hardware was all rusty, some vinegar in a bottle overnight did the job.
Looking pretty good now:
The smaller wooden pieces need some TLC next. See the piece in my vise? Yeah, we had another hidden crack.
Next up is the distress phase using the sander.
Love the way these curves look. Distressed and not:
Then a thin layer of Best Dang Wax over every part.
Thin layer of Grunge Glaze completes the look. You can see the difference against the bright table top:
Lastly another light layer of wax buffed on.
As I assembled the parts:
All together now:
The effect was spectacular:
This was great fun and the next large project awaits. I hope you enjoyed the process as much as I did.
Thank you and ciao for now.
-Trish Alger


Wednesday, April 26, 2017

playing the frame match game

Do you like handmade papers? I have a pair of framed papers with tiny pressed plants in them, and they have been requesting an upgrade for quite a while.  To make a wall grouping, I decided to add a framed chalkboard piece--all with a bit of DIY help, of course.
For this project, I used some painters tape, Americana Chalk Finish Paint for the frames, some Crème Wax coating, and for the plain glass-turned-chalkboard, DecoArt Chalkboard paint.
The handmade papers are properly framed, with sealed backings, and I really didn't want to go to the worry of dissecting and then reassembling them just to paint the frames.  So, I outlined the glass with painter's tape.  You can see the overlap, which was then trimmed with a razor blade.  Below, you can see the trimmed edge.
A simple coat of paint, and a layer of protective Crème Wax finished off all three frames.  The only slight delay was the chalkboard paint--it takes four days to cure, and then a brief baking in an oven.
All in all, I'm very pleased with this trio's upgrade.
:)trisha

ZEN for me.

I chose to recycle a canvas box frame for my project.  I got this after Fall/Christmas for clearance at 90% off, so it was ninety cents!   Y...