Friday, February 1, 2019

Take a Break

Hi Again and Happy Friday!

We here at DIY Design Studio are very excited for our Valentine's Day Card Exchange!  And, because of just finishing my cards for that very thing, I thought I would give myself a little bit of an "art break" and just doodle a bit.  I do love spending time with you though so I took some pics and thought I would bring you along with me.   
I'm sure you have heard of Zentangle.  If not, it is an art form that a couple, Rick and Maria, fell upon back around 2003.  It was a happy accident one day that happened to some of her hand lettered art.  They found that they loved the result of what happened.  They knew they could teach it to others who wanted to create, but doubted their own art abilties.  I, like most that try it find it soothing.  So, I have spent a little time each night over the last couple days and just relaxed with my journal and favorite pen, no rules, no design, just letting my mind doodle and take a break.  
I have a beautiful journal that I found at Pike Place Market years ago.   I love this little journal with its handmade papers and this is where I do most of my sketches, thoughts on my future projects, doodles and Zentangles.  

If you want to give it a try, but are a little intimidated, you can always pick up one of these fun options where a lot of the work is done for you and you can really get to relaxing.  Add some watercolor pencils and you are ready! 
Here is that beautiful journal.  It is approximately 6x6 and covered in hand dyed rice paper. 
Now, let's start a tangle.  You can see below that I create points on my page.  They can be anywhere you want.  I generally create the four quadrants like you see below to start. 
Next,  I break those quadrants up sometimes by a lot and sometimes not as much.  This one below is a more detailed version.  The beginning stages are the "no brainer" stages.  I just draw lines and shapes breaking up the square with not much thought as to the final outcome.  And, then I just doodle.  The only rule that I sometimes follow is to repeat a pattern, whether it is circles, dots or lines, etc. 
And, here is that same page with three of the four quadrants done and one with a couple swatches filled in. 
 
You do not need to be an artist to try this and be successful at it.  It may not be for everyone, but I do think everyone should give it a try.  You just need paper and a pen.  I am quite picky about my paper and pen now, but when I started I grabbed what was close and just tangled and found my moment or two of Zen.  I hope you give it a try the next time you feel the need to take a break and a breath.  Give yourself that little gift and create something beautiful in the process. 

Find your art inspiration needs at DIY Design Studio.  
Thanks for joining me!
Steph S. 

Wednesday, January 30, 2019

The Valentine Card Exchange is closing at Midnight.

Did you sign up?   


You can send/receiver either 5 or 10 cards, you choose!   Handmade, mail in the USA only by February 9, 2019.  

Sparkle, shine, lace, love, buttons, photos, mixed media, stamped images, die cuts, you pick your style and then send it off with a kiss!


 Colorized  by YOU.


When you place an order with IYDesignStudio.com  we will include a LOVE PACK filled with scrumptious bits, baubles, and fun.   No coupon needed but hurry it won't last long!  Place an order before February 1, 2019, to ensure you get yours.


Sunday, January 27, 2019

Loves Grows When Shared

Do you have a pet?  
How about a Grandchild?
When you show love so do they.

If we all share love, it would be a kinder world.  Share your love of flowers or people or places.

Here is a little piece I made to share love with everyone, even the trees!


EVERY ORDER PLACED until February 5 
 WILL RECEIVE A FREE
LOVE PACKET! 

 Each will be different and filled with fun love items, ribbon, stickers, rub-ons, papers, tulle, and who knows what else? 

Friday, January 25, 2019

Sharing the Love

Did you hear about the DIY Design Studio 
Valentine's Day Card Swap?
Well, it's true!  Share the love with other crafters and get in on this card swap.  You can follow this link to get some oh so cute (and FREE) images to make your cards.  There are instructions as well that tell you how to participate. 

Here I will show you the process of making one of the cards I will be sending out.  My card started with a pretty piece of cardstock as my background that had a vintage vibe to it.  It looked like an old canvas with oversized florals painted on it.  I tattered up the edges a bit and inked them with a blue ink pad glided directly on the surface edge.  I adhered that on my card base with PPA Glue.  I then added a gold glam sticker frame.  I LOVE these stickers.  They are so very versetile.  Next, I inked up a couple Bazzill chip board pieces with the same blue ink as the edges.  And, then gave the entire surface a wash with chalk pain in the color Vintage. I wanted to knock everything back just a bit and give it a more worn look.  
   
(the images above are me dry fitting the elements 
before 100% committing and the one below 
is after white washing the card surface)
And, then it was time to adhere all the final elements.  First, the chip boards after also giving them a wash with the Vintage chalk paint.  Then, some pretty pale blue embroidery floss, a couple bridal embellishments from my stash and then a beautiful collage image that also got a bit of white wash. 
For a finishing touch I added a handful of dainty paper and pearl flowers here and there.  That really brightened the whole card. 
This card is soft and aged and sure to give anyone the warm fuzzies when they open it. 
Thanks for hanging out with me for this tutorial.  I hope you join our Valentine's Day card swap and share in the love too!  
Have a great weekend! 
~Steph
Supplies used - 
Valentine Images

Embroidery Floss

Chalk Paint - in "Vintage"

Valentine Images

Paper & Pearl Flowers

Gold Glam Sticker

Aleene's Tacky Glue

PPA Glue

Saturday, January 19, 2019

Prepping cards for mailing LOVE

I am preparing my Valentine cards,
how about YOU?

I am die cutting medallions and fancy cutting images from our fabulous collages

There are so many sweet collages for each holiday, it gives me the push to get creative.  Darling children, Sexy women, Cute animals, we have it all!

Here are some images to spark your creative imagination...


Friday, January 18, 2019

Preserving Family Recipes

RECIPES FROM THE HEART

My project today is to encourage you to preserve those memories associated with family recipes.  Have you ever considered scrap-booking your recipes just like your photos?  The embellishment possibilities are endless.  Add personal photos or digital images.  How about fibers, buttons, pearls or Dew Drops, chip board, Scrabble tiles, ribbon...make the cards in your style or theirs!  Make a keepsake album or cookbook for yourself or as a gift.


I recently took the time to combine my grandmother's, mother's and my recipe boxes.  I found there were several that were in all three.  Some were handwritten and some were typed and my choice was to keep the earliest handwritten version of each, even if it wasn't the easiest to read.   Could I have typed them into my computer's word or recipe program and made them easy to find by an index.  Yep.  I could also have scanned them in as pictures and stored them in folders.  That's actually what I plan to do with the finished cards so that I can share them with family.  But without the actual cards, I would lose a piece of the sentiment...the history...behind them.


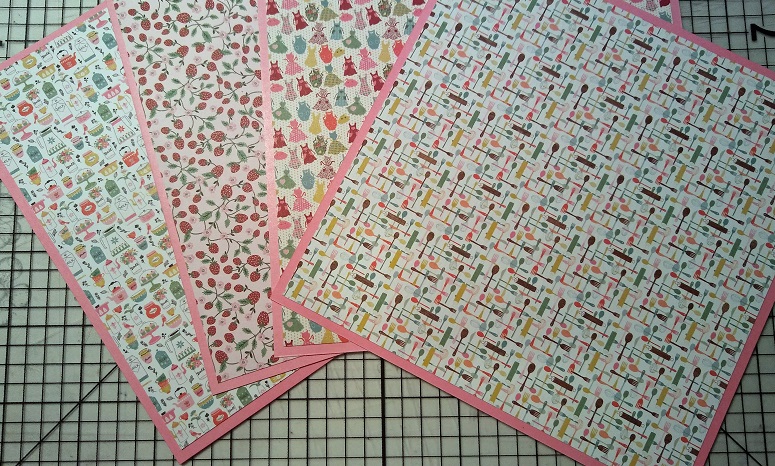
 I chose to work with two Authentique paper pads.  Both Saucy and Fabulous have wonderful retro designs.  Since many of my old family recipes are from my grandmother and mother-in-law the patterns are perfect.  


Between the two paper pads, there are a few kitchen-specific themes.  Pictured above are pans & kettles, strawberries, aprons and utensils.  I chose a pink card stock because each of these four has a pink element in the paper.  I made the decision to permanently mount these three cards because there was nothing written on the back.  You could also use photo corners.  If your recipe card has a B-side, you could pop it into a clear sleeve or glassine envelope and have it flip up to access the rest.  I plan to photocopy any of the backsides and attach them to the back of the card.


For this recipe from my grandmother, I chose to put her picture on the front.  This is one of my very favorite photos of her and my mom and I.  This is one of those recipes that was in all three boxes and I thought a photo of the three of us was a fun nod to that.  I made a brief note about the photo on the back.  Two little gold glam stickers are on the front to give it a little tiny touch of bling.  Pretty, without being too fancy.  Gram would approve.  


This recipe from my mother-in-law is from one of the first family dinners that I was invited to!  I asked what she wanted me to bring and she handed over this chicken casserole  recipe that was a family favorite.  Now that she's gone, I make it with sour cream.  I can make that change now on my photocopy without altering her beautifully written card.  It's embellished with some darling ribbon and a charm that says, "HAND MADE WITH LOVE."  Absolutely fitting for the woman who was my second mom.  The picture of the woman cooking was cut out of another sheet of paper from the Saucy paper pad.


My mother preferred her cards typed and used to pull out her old 20 lb. Royal typewriter with the sticky keys when she found one that she wanted to keep.  Even in the full size scan, you can't see that there are two pretty big folds in the card.  I can't tell if it got caught in the box or just damaged while she was cooking, but just looking at the stains on it tells me it was one of her go-to recipes.  It's probably why I love short ribs now!  This card was embellished with a pink ribbon and more fun pictures cut out of the paper pad.


Be sure to scroll down so you can access full copies of each of the recipes.  Please use and enjoy the recipes!!  


Tuesday, January 15, 2019

Celebrate Creativity wth LOVE


Since we are hosting a Valentines Card Exchange...
We want to give you some images to spark your ideas!  These can be incorporated into your cards exterior or interior.

ENJOY and make sure to sign up for the exchange!
Send your name, mailing address and choice of either 5 or 10 cards to Artsociates@gmail.com (information is kept confidential and shared only with those on your exchange list)  Just right click on the image and 'save as' to your computer desktop.  Your mailing list will be sent to you by January 31, start making your cards NOW!

As a Special Treat, to make participating in the exchange more enticing, you can use coupon code HEARTFELT and receive 25% off your total merchandise order!


Have fun and we sure hope to see you participate.

Image may contain: text


ZEN for me.

I chose to recycle a canvas box frame for my project.  I got this after Fall/Christmas for clearance at 90% off, so it was ninety cents!   Y...