I am in love with the entire DIY scene! I have scads of empty glass bottles in my garage just waiting for an opportunity like this:
Dixie Belle Chalk paint is perfect for covering glass bottles. A little Grunge Glaze and some embellishments are all it takes.
Ciao for now,
-Trish Alger
Wednesday, October 19, 2016
Wednesday, October 12, 2016
Fun and Funky Lamp Redo
Welcome DIY'ers!

Today I am transforming a tired old lamp using Dixie Belle Paints. Join me in this quick tutorial and learn how you can give new life to an out dated old lamp.
I began with a very beautiful lamp. It was actually one of my favorite pieces when my house was decorated in the Old World Tuscan look. I unfortunately, forgot to click a quick pic before I started painting. The lamp was originally dark, gold guilded and very old Mediterranean style. It holds a special place for me so when it no longer matched my current design trend I thought let's just make it fit as I just could not stand parting with it. So, here you see it with the base coat of Dixie Belle Chalk Paint in Gulf, still very pretty, but not quite what I was after as it was a little vibrant for what I was going for.
I then added a coat of Grunge Glaze. I painted it on using these great chip brushes and wiped away the excess with paper towel. I cannot even tell you the difference the Grunge Glaze made...no need to clear coat, wait, what? Skip a step? Yes, that is what I said. If you desire the added protection of a clear coat, however, then please use this satin clear coat sealer. You will not be sorry.
I am so very pleased with this Dixie Belle redo.
I can't wait to get my hands on the next one!
Thanks for stopping by!
Steph S. for DIY Design Studios
Wednesday, October 5, 2016
Give it in PARIS!
I had a white box that I have been wanting to use to do something
Parisian with it!
My white blank board box didn't inspire me, I needed something more rustic. Dixie Belle paints were perfect for the project. The paints and glazes are great for any surface...wood, metal, glass, laminate, ceramic and even fabric! EVEN paper and cardboard!

I first painted the box with a thin almost dry coat of Dixie Bell Paint - ButterCream, the reason is the cardboard is pourous and I didn't want the Dixie Belle - Vandyke Glaze to soak into the cardboard.
Supplies:Dixie Bell Paint - ButterCream
Next I painted a light layer with an almost dry brush of Dixie Belle - Vandyke Glaze, that gave me the texture I was looking for on my box! Now I have a rustic box to work with.
Dixie Bell Paint - Flamingo Paint with the Paris Stencil, be careful to stencil with a dry brush or rag... add layers of paint... avoid seepage under the stencil!
LET DRY!
Add German Scrap around the edges for a little bling! Paint over the word Paris with Wink of Stella Pen!
Add a few paper handmade flowers and you have a beautiful gift box!
Wednesday, September 28, 2016
DIY gender reveal party decorations
As first time grandparents-to-be, we recently hosted a gender reveal party for our second son and daughter-in-law. Are you ready? There are quite a few photos in this post, with plenty of diy decorating ideas.
This was a casual outdoor occasion, with a little over 30 guests. The color scheme was basic baby pink and blue.
Here is an easy DIY decoration--hang some pink and blue vintage baby clothes (the blue outfit was grandpa's, making this even better!)
Construction paper rosettes, always one of my favorite go-to decorations!
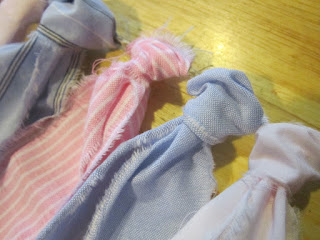
Fabric rag swag
You can purchase fabric to make these swags, but a less expensive, not to mention greener, option is to visit a thrift store and find whatever cotton shirts happen to be on clearance. Cut or tear the fabric into the desired length of strips, and attach as follows to a length of twine or clothesline. I generally use jute twine for hanging, but be sure it's a 3 ply for strength.
You can add other elements, such as burlap panels, like I did here for a baby shower:
Back to the gender reveal--it was a windy day, and even though you can't see these in the photos, I absolutely LOVE these DIY tablecloth weights! So handy, inexpensive, and easy to make:

Regular spring clip clothespins, with large sized glass dragon tears glued to the ends--simply clip these to the corners, and sometimes center edges, depending on how windy it is, of the tablecloths to keep things from blowing about.
Centerpieces--vintage baby shoes stuffed with tulle and tiny glass jars filled with wildflowers. These were set on pink or blue trimmed hankies (my grandma's) on "silver" platters, along with lengths of ribbon.
That covers all the basic decorations. All of these things were either in my art or decorating stash, along with a vintage stork you can see here. Just in case you're interested, and at the risk of oversharing, here is the actual reveal:
Just in case there was any doubt, the blue-for-boy was repeated in the delicious cake, made by daughter-in-law #1:
Baby Boy is due in early January--how much baby stuff do you think I can get made by then????
Happy Wednesday!
:)trisha
This was a casual outdoor occasion, with a little over 30 guests. The color scheme was basic baby pink and blue.
Here is an easy DIY decoration--hang some pink and blue vintage baby clothes (the blue outfit was grandpa's, making this even better!)
![]() |
| tiny clothespins are always a fun touch! |
Fabric rag swag
![]() |
| tiki torches and table candles were citronella, keeping away mosquitoes |
![]() |
| 1. Loop fabric strip, as shown, and lay it under a length of twine |
![]() |
| 2. Bring the two ends of the looped fabric around twine & through fabric loop |
![]() |
| 3. Pull the ends as tight as you like |
![]() | ||
| Here is my result--yours may be tighter, or looser, or differently spaced. |
Back to the gender reveal--it was a windy day, and even though you can't see these in the photos, I absolutely LOVE these DIY tablecloth weights! So handy, inexpensive, and easy to make:

Regular spring clip clothespins, with large sized glass dragon tears glued to the ends--simply clip these to the corners, and sometimes center edges, depending on how windy it is, of the tablecloths to keep things from blowing about.
Centerpieces--vintage baby shoes stuffed with tulle and tiny glass jars filled with wildflowers. These were set on pink or blue trimmed hankies (my grandma's) on "silver" platters, along with lengths of ribbon.
![]() | |||
| the tables also had a sprinkling of star confetti |
Just in case there was any doubt, the blue-for-boy was repeated in the delicious cake, made by daughter-in-law #1:
Baby Boy is due in early January--how much baby stuff do you think I can get made by then????
Happy Wednesday!
:)trisha
Wednesday, September 21, 2016
Christmas Tree Card Hanger
Christmas is on its way and a DIY Christmas card holder was in order.
Using the following you too can create a cute and easy-peasy project to use or to gift.
Wood and Chicken Wire Tree
Dixie Belle Chalk Paint in Fluff
Dixie Belle Glaze in Gold
Dixie Belle Best Dang Wax in Clear
Tiny Cute Clothespins
I taped off the chickenwire, painted the wood portions of the tree with the Fluff paint, and let dry.
Then I lightly sanded-down the small bits of wood that swelled and splintered from the paint and added some gold glaze.
After the glaze dried I used a soft cloth to rub on the clear wax in a small layer and after letting it set for an hour I came back and buffed it with the same cloth.
Such an easy project with a cute utilization.
There is so much more you could add yourself to personalize it. Let us know what you create!
Ciao for now,
-Trish Alger
Using the following you too can create a cute and easy-peasy project to use or to gift.
Wood and Chicken Wire Tree
Dixie Belle Chalk Paint in Fluff
Dixie Belle Glaze in Gold
Dixie Belle Best Dang Wax in Clear
Tiny Cute Clothespins
I taped off the chickenwire, painted the wood portions of the tree with the Fluff paint, and let dry.
Then I lightly sanded-down the small bits of wood that swelled and splintered from the paint and added some gold glaze.
After the glaze dried I used a soft cloth to rub on the clear wax in a small layer and after letting it set for an hour I came back and buffed it with the same cloth.
Such an easy project with a cute utilization.
There is so much more you could add yourself to personalize it. Let us know what you create!
Ciao for now,
-Trish Alger
Saturday, September 17, 2016
New DIY Kits for YOU
Yes, we have Seasonal and Holiday kits.
Please take a look and find one just right for you, click here!
This kit has wood blocks that are reversible, so put them on a shelf in October and leave them out til Christmas!
Wooden coffin has a wooden stand too!
Darling ornament for gifting, comes with it's own tin box. Perfect for hostess gifts or Teachers.
ORDER TODAY to make sure they are in stock.
Wednesday, September 14, 2016
Moraccan Makeover
Let's do a quick little makeover, okay? Okay! And, let's do it with some Dixie Belle Chalk Paints from DIY Design Studio.
I have a beautiful set of Moroccan inspired glass jars. They are a lovely amber colored glass with ornate etched silver bases and lids, picture 100 year old amber apothecary jars (not really, but close). I LOVE them! However, they don't quite match the interior of my house since we did a bit of redecorating. So, Dixie Belle Chalk Paint to the rescue since it works perfectly applied right over glass. I used a half and half mixture of Fluff (white) and Buttercream. See the wonderful results for yourself.
The before...
The during...
The After...
If you like you can give them a quick sanding to reveal the surface below the paint. I am not quite sure if I want to do that yet. I am going to "live" with them for a week or so and see how I feel.
The Dixie Belle paint goes on like butter, well better than butter. I used a chip pain brush to apply and I applied approximately three light coats. If and when I chose to give it a bit of texture and further interest, I will use this sanding sponge and most likely a coat of satin clear coat sealer. I might also add a bit of the Van Dyke brown glaze just for some depth of color. The best part is this is just paint. If I decide I want the amber back some day I can just sand most of it off and I think that would be a beautiful look as well...just some chippy bits of creamy white left behind...
I hope you enjoyed my quick little make over. This just goes to show, never get rid of something that no longer fits the color scheme...just give it new life with Dixie Belle Chalk Paints!
Thanks for stopping by.
~Stephanie
Subscribe to:
Posts (Atom)
ZEN for me.
I chose to recycle a canvas box frame for my project. I got this after Fall/Christmas for clearance at 90% off, so it was ninety cents! Y...
-
I chose to recycle a canvas box frame for my project. I got this after Fall/Christmas for clearance at 90% off, so it was ninety cents! Y...
-
As first time grandparents-to-be, we recently hosted a gender reveal party for our second son and daughter-in-law. Are you ready? There ar...
-
Look, let me tell you right now, I did not make this. But I love it, so I'm going to share it with you, yes? And it clearly once again...


