Friday, September 9, 2016

Funny little Punkins!

Yep, those dollar store Pumpkins can be masterpieces!

Using Dixie Belle Paints you can create awesome holiday decor with minimal expense.

(courtesy of Virginia Bittinger)


Start with your average faux pumpkin (or a real one)

Add  a coat of DBP in Sage Green or Butter Creamy, maybe even Gulf blue or Plum Crazy for extra fun!

Allow to dry and then add a light glaze of Van Dyke Brown for an aged appearance and weathered look.

Add your embellishments like jute or fall leaves, use your imagination and VOILA!


Plenty of great stuff at www.DIYDESIGNSTUDIO.COM

Wednesday, September 7, 2016

DIY a Fall Wreath

Using craft sticks a little paint and glue make your own wreath!!!  Dixie Bell Paint coverage is awesome.  You will love using it on your projects!


Supplies:
Dixie Belle Paint: Flamingo Chalk Mineral Paint and Van Dyke Brown Glaze
Large Craft Sticks
Cardboard
Tacky Glue
Ribbon
Floral stem

 
Cut 2 rings the size you would like your wreath (for sturdiness tacky glue the 2 rings together).  Outside of the ring is 8 inches across and the center 4 inches.

 
Tie a 12 inch piece of  ribbon around the cardboard to use to hang the wreath with when finished.

 
Layer about 50 large craft sticks with tacky glue on the cardboard, set aside to dry. 

 
A look from the back of the wreath.

 
Once the glue is dry paint with Dixie Belle Flamingo Chalk Mineral Paint 

 
Set aside to dry.


With a  rag lightly paint with Dixie Belle Van Dyke Brown Glaze.

 
Let Dry.

 
Attach floral stem and bow!


Sunday, September 4, 2016

Ready for Fall?

And it begins!  Seems like when September hits we begin seeing a flurry of activities that doesn't stop until New Years!


  • Back to school activities 
  • Fall Holiday planning
  • Football weekend entertaining
  • Hostess gifts for parties
  • Create menus for gatherings
  • Make and mail cards
  • New outfits and party clothes
  • It makes me dizzy!
We sure can help with some of the items.    Darling and inexpensive hostess gifts begin with upycled glass/mason jars and chalk paint, tie with a ribbon and Voila!


created by 'Hop to it'

OR how about a darling personalized shelf sitter using wood blocks with papers and embellishments....


created by Jean Moore

All made so easy and beautiful with Dixie Belle Chalk Paints at our store.   Please visit to see some great products.


We have a weekend special of 10% off your total order...
USE COUPON CODE LABOR


Sunday, August 28, 2016

Almost September!

We really are getting into Fall and that means celebrating the beauty and fun of Fall andWinter Holidays.

Here are some items you may want to try without fantastic paints and accessories.  We will have MORE kits soon in the store, you get wood, paint(s) and brush, some include stencils with instructions.


created by Amy F Wagner


Fun Stuff by Emily Jeremaison


Made by Stephanie Berger Sydnor


UPCOMING KITS for wood coffins, pumpkins, Trees and more!

See the website for some awesome gift ideas and DIY solutions.

WWW.DIYDESIGNSTUDIO.COM

Saturday, August 20, 2016

MORE Great Ideas with DIY

I have to admit I stole this idea but it is so worth sharing!

Living in Arizona (and many other locations) we are very susceptible to sunburns. We grow Aloe Vera plants and use them often for burnt fingers and such.   We also have aloe vera gels and juices.  AV is so cooling and really does help with blistering and pain relief.  


WELL people, get to your dollar store and buy an ice cube tray.   Fill each hole with Aloe juice and water or Aloe Gel.   Make your own with snips of your Aloe plants placed in water (slice the piece open to expose the inner juice)  FREEZE and Voila!   If you like essential oils, add one  or two drops to each cube. Peppermint or Spearmint or Lavender would be wonderful. 

Instant relief and cooling as can be!   Use one at a time directly on the burn (careful not to freeze your skin). 

Now for some inspirational Painted items, ORDER that Paint and get going!


Wendy Wilson shows us how to paint, transfer and embellish!


Claire Matthew stained and then used Swamp mud and a stencil for this masterpiece bench.   You can colorize the swamp mud or paint over it.  Always good to seal projects too!


ORDER THIS WEEK AND GET A FREE CHIPBRUSH!  


Wednesday, August 17, 2016

Dixie Belle Self-Portrait Transfers

Hello, Trish here. I'm so excited to share my first DIY Design post with you.
As an artist I've always intended to do a true self-portrait, but frankly I'm terrible at selfies and kept putting it off. Then I read a book about the importance of family portraits and wondered, "why not?"

I read that chalk paints make the best transfer surface and well we here know what the BEST chalk paint is, right?!


The supplies are so easy peasy:
Dixie Belle Chalk Paint   
Dixie Belle Clear Coat Sealer    
Dixie Belle Grunge Glaze 
Stencil 
Substrate (such as a canvas or piece of wood )  
Toner copy of YOU!

I chose a couple of selfie pics that I did not hate, printed them in mirror format on my printer, THEN took them to a store to copy in black and white on a toner cartridge printer. (Very important to use a toner copy!) Trim out the excess...


I just happened to have these little canvases to try it out with. I also tried it on foam board and it worked fine.

Decide which awesome Dixie Belle Chalk Paint to use. I chose Buttercream. Placing the image face down in the WET paint. Brayer and rub it into the paint to smooth out.


Wait to dry completely. Does not take long. Wet your fingers and rub slowly and gently in a circular motion to rub off the top layer of paper.


I happen to love the imperfections, but if it would make you crazy...then start from inside edges first and go very slow. Keep it damp and eventually you will emerge.


Now, I did not wait for it to completely dry before I added the Dixie Belle Grunge Glaze and then the Dixie Belle Grunge Glaze and I payed for it later. I still had some small bits of paper left, but now it was trapped beneath product. 
Cie la vie!

Here it is with the glaze:


After the clear coat:


Of course I had to jazz it up a bit, using a stencil.


Just a touch though and added the year the photo was taken with a paint pen, because I'm sure I will forget.


Well, that sure was fun! Thank you for following along.
See ya next time with more DIYDesign Studio fun.
-Trish Alger


Wednesday, August 10, 2016

Reviving an Old Tray with Dixie Belle.

Hi, Stephanie here and welcome to my first
DIY Design Studio Project. 

I know this will be one of many as I just can't get enough DIY home and craft projects and

Follow along to see the special going on this week..


For this project I chose a beat up metal tray that previously housed a very pretty floral arrangement, but it no longer matched my decor.  The flowers were repurposed into a pretty fall wreath and the tray, well I will show you the steps I took to revive it into something a bit more "me".

You can see below the old scratched up tray.  It is about a foot and a half long by about 6 inches tall.  It always worked great as a dinning table centerpiece because it is low profile so you don't have to strain your neck to chat with the other guests.  As I said above, I removed the floral arrangement and all of its remnants including hot glue and florist foam.  


And, here you see the tray painted with the first coat of  Dixie Belle Paint in Gulf.  I did give it a light wipe off and sanding prior to painting just to get good adhesion.  This was probably not necessary.  

You can find a great sanding sponge  Here.  

I gave it two coats of paint.  Here you can find a great chip brush to use.


I then sanded again, but this time I was pretty vigorous.  I really wanted to knock a good bit of paint off to reveal the finish below.   


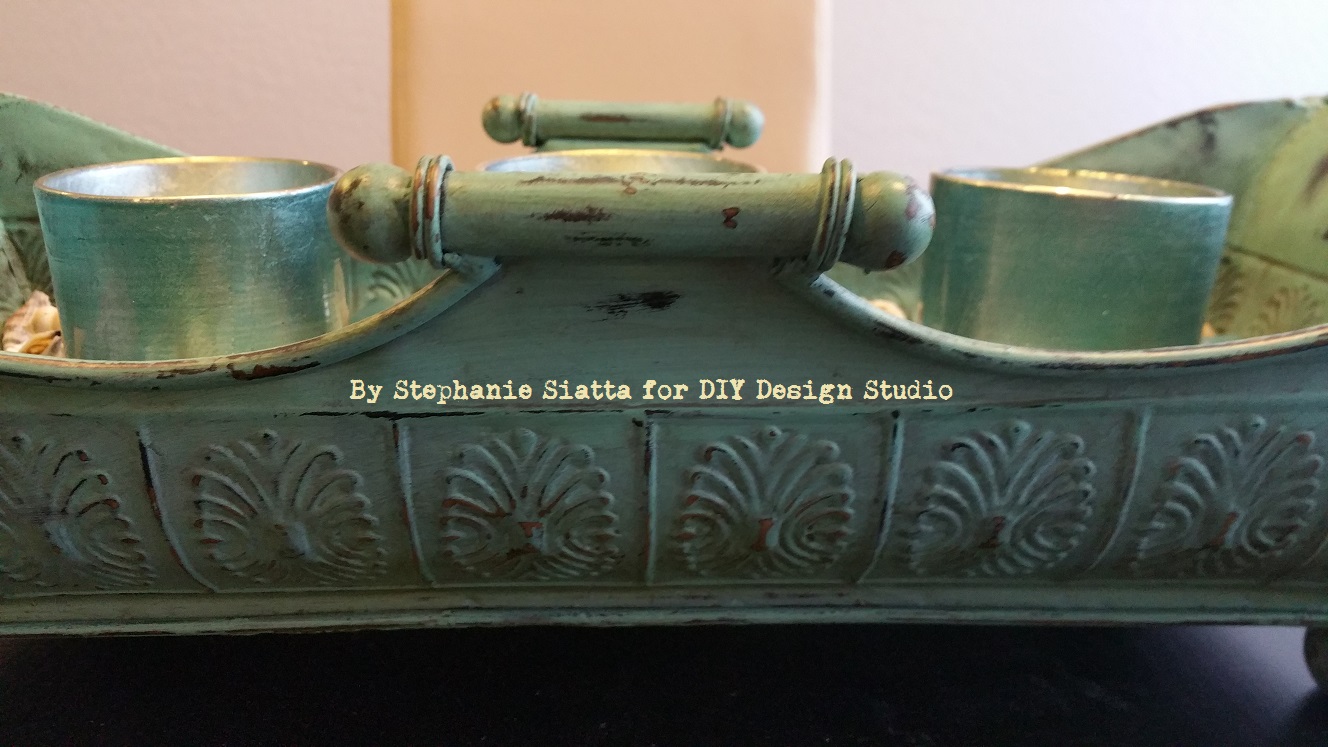
Then, I added a coat of Dixie Belle Grunge Glaze.  This really made all of the raised detail and distressing that I did pop!  As soon as I started painting this step I literally was ooohhing and awwwwing.  You know you've done it before when your project just hits that next level of great.  The Grunge Glaze did that for me.


Finally, I added a coat of Dixie Belle Clear Satin Sealer.  This will ensure years of pretty service as a center piece, candle holder, utensil caddy on my buffet...whatever I want, really.   


This time around it is a bit coastal with sea shells, beach glass and three turquoise mercury glass tea light candle holders. 


In a month or so, it will be full of gourds, mini pumpkins, fall leaves and fall scented candles.  

Then, I see skulls, bats, owls and spiders...black, orange, green, purple.....I bet you know where I am going with this.   And, so on and so on for fun decorating for every season and holiday. 

I can even repaint it over and over if I so choose and Dixie Belle will be the paint of choice for me!  There are so many fun colors to choose from and each layer will only make it better.


Make sure to pick up all the supplies you need to get DIY-ing at

We still have our special going = purchase 50.00 and get a FREE Paintbrush, spatula and sanding sponge.    NO coupon necessary, regular shipping applies to orders.

Thanks so much for joining me and DIY Design Studio!
~Stephanie Siatta

ZEN for me.

I chose to recycle a canvas box frame for my project.  I got this after Fall/Christmas for clearance at 90% off, so it was ninety cents!   Y...